If you have problems making the connection or if there are other problems of a physical nature (defective socket, defective cable) you can make a ticket using the ticket system.
To log in, each student will use their own institutional account (the one used to access Gmail, Meet, Team, etc.) and its related password.
For the first use, we need to create a PPPoE connection. On future logins, we will no longer need to follow the steps to create the connection, because we can use the one already created.
Create a PPPoE connection
Windows
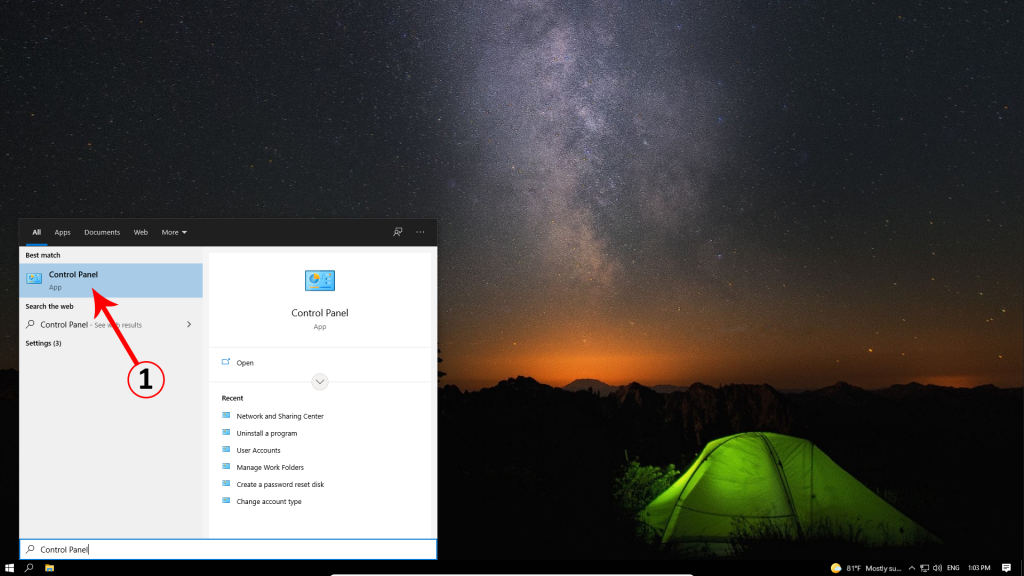
Step 1: Open ,,Control Panel” (Fig. 1).
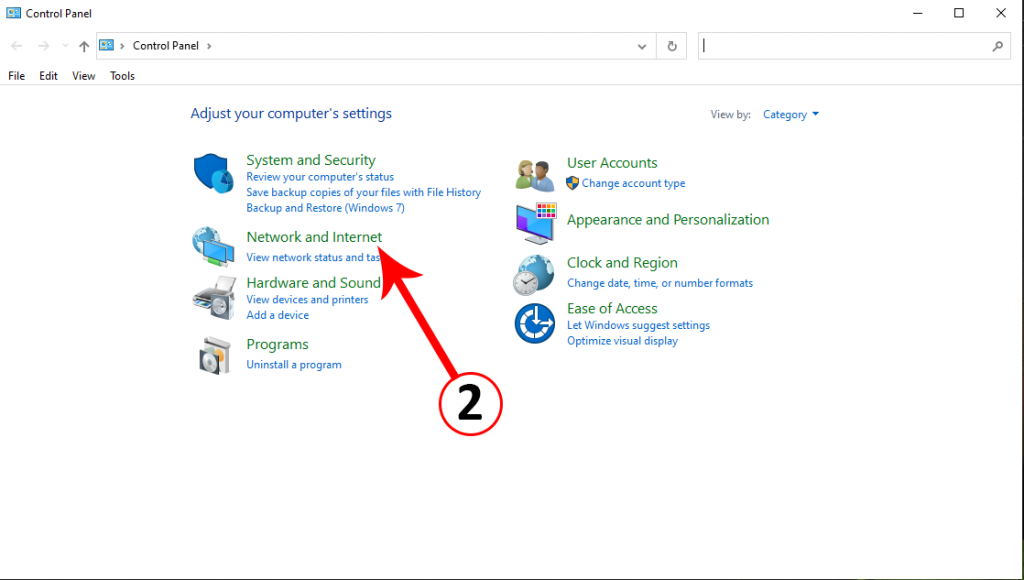
Step 2: Access category ,,Network and Internet” (Fig. 2).
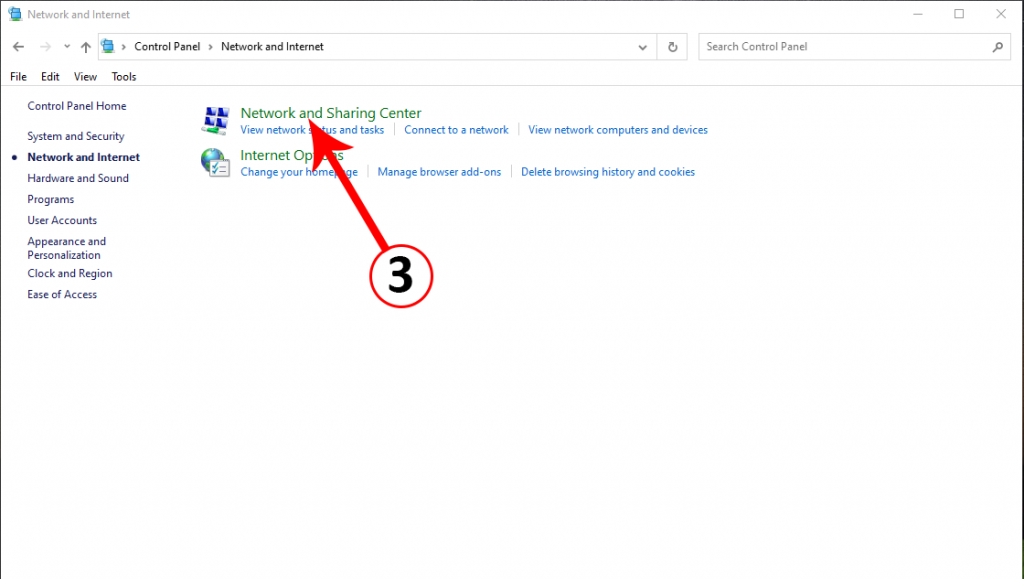
Step 3: Select option ,,Network and Sharing Center” (Fig. 3).
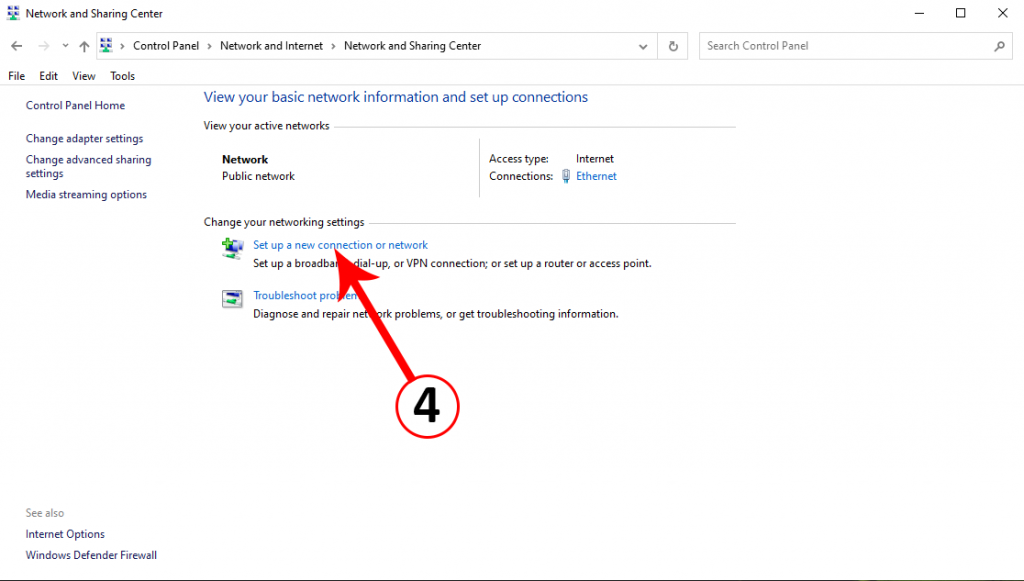
Step 4: Create a new connection by accessing the option ,,Set up a new connection or network” (Fig. 4).
Step 5: Select ,,Connect to the Internet" and then press Next (Fig. 5).
Step 6: Select ,,Broadband (PPPoE)” (Fig. 6).
Step 7: We need to enter the institutional account login data. In the field "User name" the institutional address must be entered (for example: firstname-surname.lastname@student.tuiasi.ro), in the field ,,Password" we enter the password of the account, and in the field ,,Connection name" we add the name we want to call the connection. We can check the box for the option ,,Remember this password" so that we don't have to enter the password every time we try to connect (Fig. 7).

Fig. 1: Accesare „Control Panel” 
Fig. 2: Accesare „Newtork and Internet” 
Fig. 3: Accesare „Newtork and Sharing Center” 
Fig. 4: „Set up a new connection or network” 
Fig. 5: „Connect to the internet” 
Fig. 6: „Broadband (PPPoE)” 
Fig. 7: „Broadband (PPPoE)”
macOS
Step 1: Open Apple menu > System Preferences (Fig. 8).
Step 2: Select category ,,Network” (Fig. 9).
Step 3: We create a new connection by pressing the button "+” (Fig. 10).
Step 4: Select from the field "Interface" the PPPoE option and in the field "Service Name" we can enter a name for the connection (Fig. 11).
Step 5: We select the connection created in the previous step, and enter the data from the institutional account. In the field "Account Name" the institutional address must be entered (for example: firstname-surname.lastname@student.tuiasi.ro), and in the field ,,Password" enter the password.
After entering the data, we must check the option "Show PPPoE status in menu bar". In order to not enter the password every time we connect, we must also check the option "Remember the password”.
At the end of the configuration, press the button "Apply” (Fig. 12).

Fig. 8: System Preferences… 
Fig. 9: Selectare categorie Network 
Fig. 10: Adăugare conexiune nouă 
Fig. 11: Selectare conexiune PPPoE 
Fig. 12: Configurare conexiune
Linux
Before following the steps below, we must make sure that we have connected the cable in the device that we want to connect to the Internet.
Step 1: Open the terminal and enter the command "sudo pppoeconf" to start the connection configuration process (Fig. 13).
* During the configuration, various questions will appear to which we will answer each time with "Yes/Ok„
Step 2: In the window where we are asked to enter a username, we will enter the address of the institutional account (for example: firstname-surname.lastname@student.tuiasi.ro) (Fig. 14).
Step 3: After entering the name, we will also have to enter the password of the institutional account(Fig. 15).

Fig. 13. Înitiere proces de configurare 
Fig. 14. Introducere username 
Fig. 15. Introducere parolă
Connect to the internet
Windows
If we already have the connection created we can go to step 1. If we do not have a PPPoE type connection, we must follow the steps in the section "Create a PPPoE connection” > „Windows„
Step 1: In the taskbar, click on the icon that displays the connection status. Then we open the previously created connection. ("Create a PPPoE connection” > „Windows„) (Fig. 16)
Step 2: A window with Internet settings will open where we will have a button "Connect" under the name of the PPPoE type connection. Press this button and wait for the connection to be made (Fig. 17).

Fig. 16 Accesare conexiune PPPoE 
Fig. 17 Conectare
macOS
If we already have the connection created we can go to step 1. If we do not have a PPPoE type connection, we must follow the steps in the section "Create a PPPoE connection” > „macOS„
Step 1: From the main bar, access the icon related to the Internet connection settings.
Step 2: Press the button "Connect NAME" to initiate the PPPoE connection (Fig. 18).

Fig. 18 Conectare conexiune PPPoE
Linux
If we already have the connection created we can go to step 1. If we do not have a PPPoE type connection, we must follow the steps in the section "Create a PPPoE connection” > „Linux„
Step 1: To start the PPPoE connection we must open the terminal and write the following command "sudo pon dsl-provider” (Fig. 19).

Fig. 19 Conectare conexiune PPPoE

